

Сложно выбрать дом без лишних трат. Подход люкс-поездок помогает сузить пул быстро. Используйте чек-листы, маршруты и сервис. Сократите риски и ошибки. Получите дом, где каждый день как в отеле.
Подбор жилья становится проще, если применить логику пятизвездочных поездок и премиального проката: маршрут, тишина, сервис, время. Для стартовой ориентации по рынку пригодится витрина проектов — новостройки Москвы. Специалисты отмечают: те же приёмы, что экономят часы в перелётах и на аренде авто, экономят месяцы на поиске квартиры и снижают вероятность промаха почти до нуля.
Подход люкс-поездок превращается в алгоритм выбора ЖК
Алгоритм из люкс-поездок переводит хаос выбора в четкий маршрут: критерии → фильтр → короткий шорт-лист → тест-драйв района → финальный торг. Такой порядок экономит время и фиксирует качество.
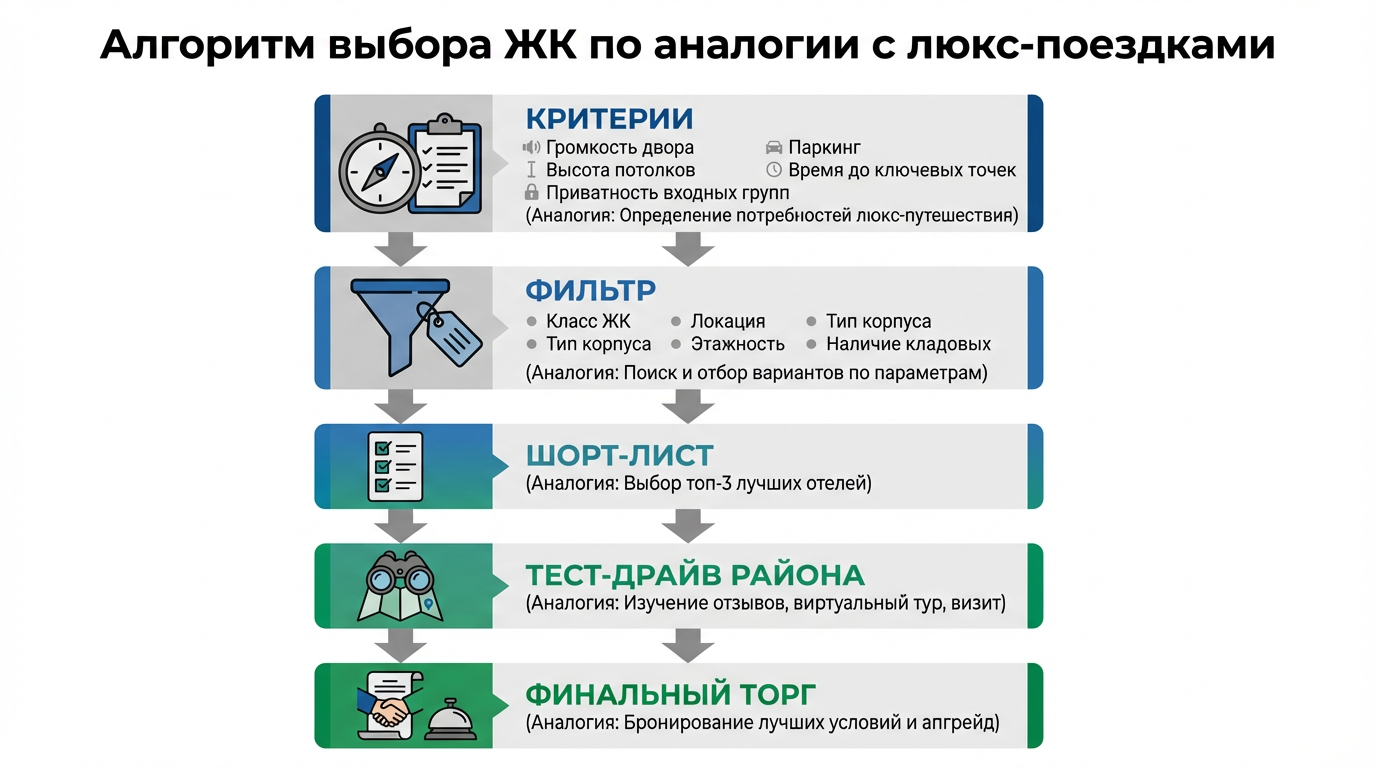
Первым делом критерии формулируются ясно, почти без сантиментов: громкость двора, высота потолков, приватность входных групп, паркинг, время до ключевых точек дня. Специалисты советуют выписать три обязательных и три желательных пункта — как при подборе пятизвездочного отеля, где важны тишина номера, размер кровати и вид. Затем рынок режется фильтрами: класс ЖК, локация, тип корпуса, этажность, наличие кладовых. По опыту коллег, уже на этом шаге перечень сокращается в три-четыре раза, что снимает усталость и помогает смотреть на факты, а не на рекламные рендеры. Дальше подключается логистика: строится карта ежедневных поездок, как при планировании перелётов со стыковками, и метится допустимое время в пути. В результате остаётся компактный шорт-лист, с которым можно работать предметно, без суеты.
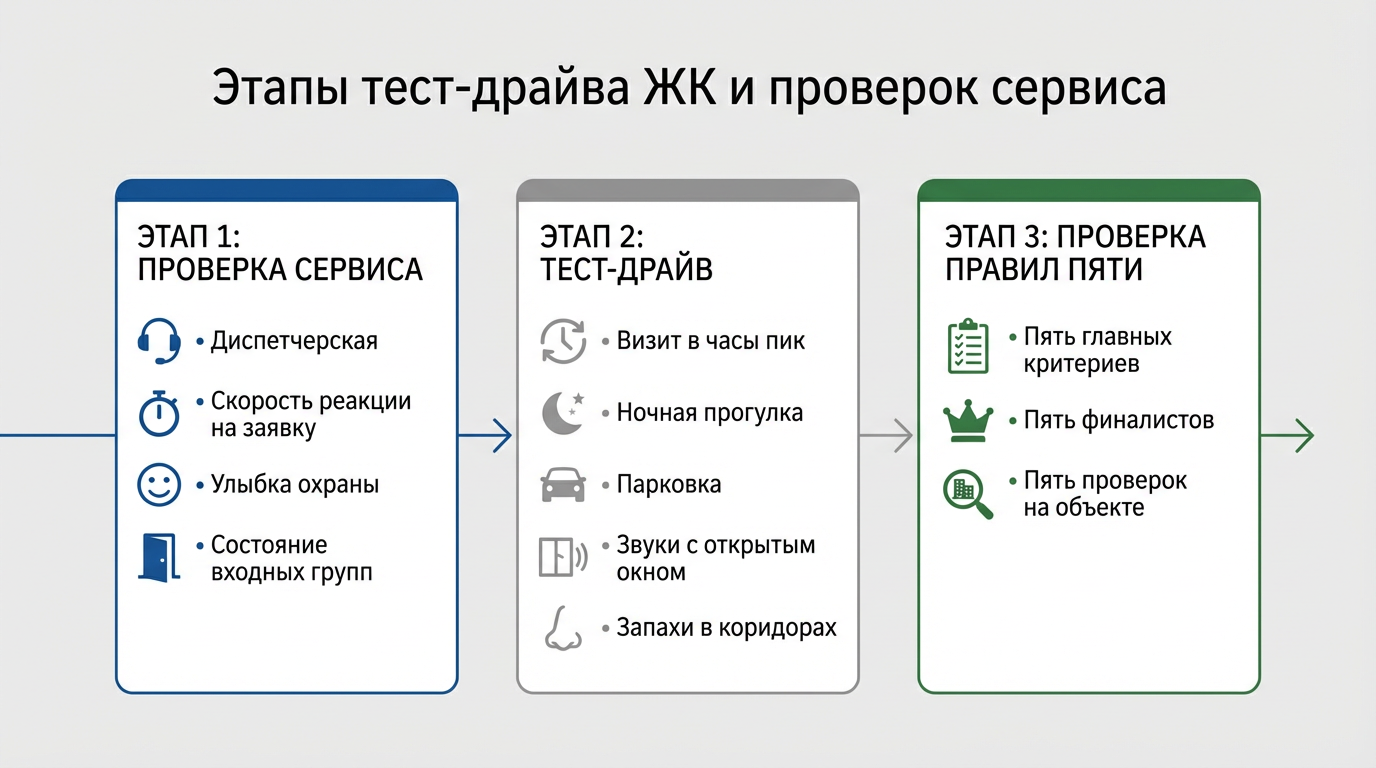
Следующий слой — проверка сервиса на земле, а не в буклетах. В люкс-поездках персон стала надежным барометром качества: если консьерж улавливает ритм гостя с порога, отель стоит внимания. В ЖК роль такого барометра играет диспетчерская и управляющая компания: скорость реакции на заявку, улыбка у охраны, состояние входных групп в дождливый день. Практика показывает, что именно здесь вскрываются различия между реальным бизнес-классом и бодрым комфортом под глянцем. Экспертам по аренде авто знакомо, как один звонок в саппорт раскрывает всю компанию — в домах работает тот же принцип.
Финал алгоритма — «тест-драйв» места и переговоры. Тест-драйв подразумевает визит в часы пик, ночную прогулку, парковку вблизи подъезда, проверку звуков с открытым окном, оценку запахов в коридорах. А переговоры идут как апгрейд номера на стойке: корректное, спокойное сравнение условий, аргументы фактами, ссылки на альтернативу из шорт-листа. По опыту коллег, торг по доп. опциям — кладовая, место у колонны, частичная меблировка лобби — часто даёт больше пользы, чем попытка сбить чистую цену. Такой подход работает без надрыва и лишних эмоций.
Ключ к устойчивому выбору — не перегружать список параметров. Специалисты рекомендуют работать с «правилом пяти»: пять главных критериев, пять финалистов, пять проверок на объекте. Этот ритм дисциплинирует, оставляет голову ясной и держит «вау-эффект» под контролем. Люкс-поездки учили наслаждаться сервисом без спешки; жильё как раз тот случай, где нет смысла гнаться за рекордом скорости, важнее двигаться по треку без сноса на обочину.
Чек-лист критериев превращает вкус в измеримый профиль
Чёткий чек-лист переводит личный вкус в измеримые баллы и минимизирует спорные решения. Он помогает сравнивать проекты на равных, а не поддаваться эмоциям.
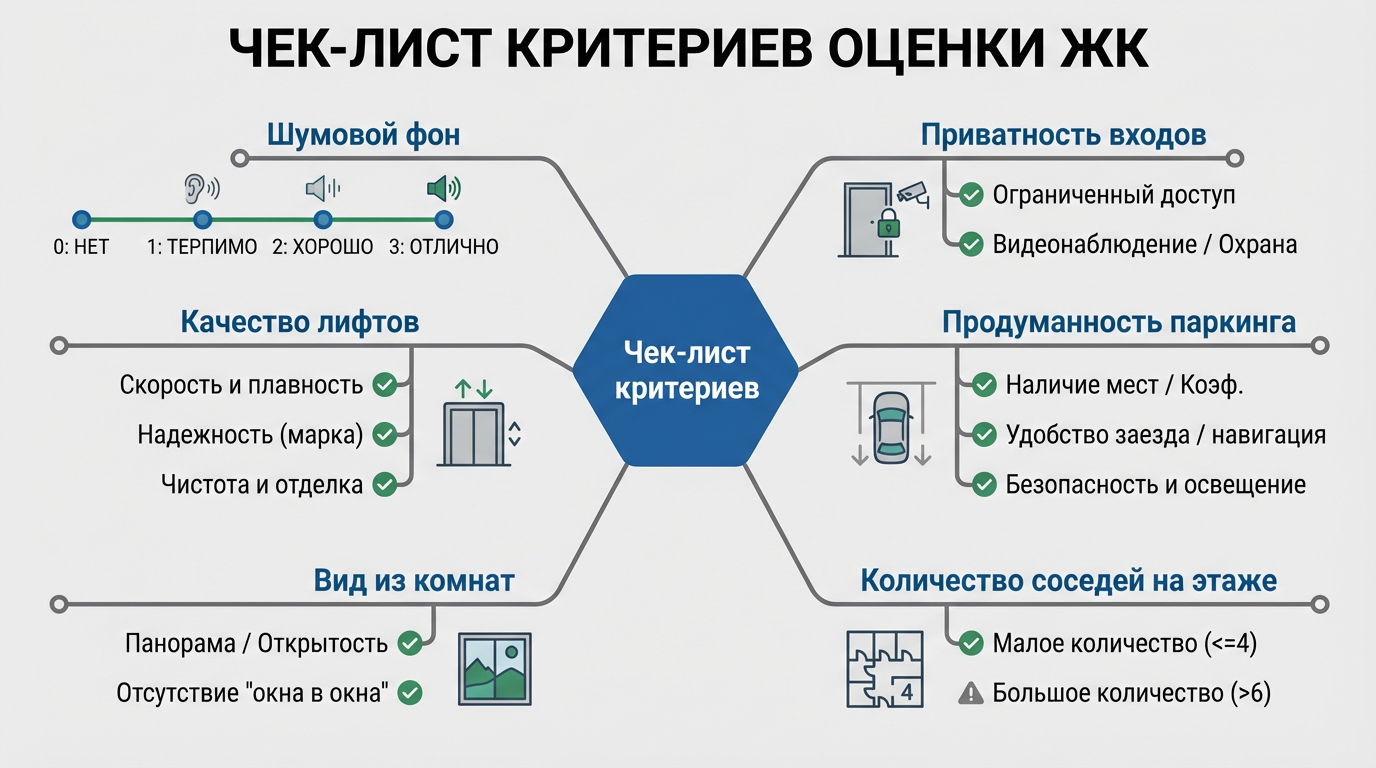
Эксперты советуют простую шкалу от нуля до трёх по каждому пункту: ноль — нет совсем, единица — терпимо, два — хорошо, три — отлично. Такой метод визуализирует разницу даже у близких проектов. В списке обязателен шумовой фон, приватность входов, качество лифтов, продуманность паркинга, вид из основных комнат, количество соседей на этаже. Аналогично тому, как в люксовых поездках оцениваются тишина номера, работа штор, высота матраса и сорт кофе на завтраке, здесь оценивается базовая повседневность дома. По опыту коллег, два часа с таким листом экономят недели переписок и визитов. И да, скучный блокнот чаще побеждает самый яркий рендер.
Уроки аренды люксовых авто: считать полный бюджет владения
Полный бюджет владения показывает правду: цена метра — лишь часть истории, решают паркинг, эксплуатация, налоги и время в пути. Такой расчёт предотвращает разочарования.
В премиальном прокате распределённые расходы всегда шире тарифа: франшиза, дополнительный водитель, платные дороги, топливо и парковка в центре. Жильё работает так же: ипотека — не весь бюджет, эксплуатация, паркинг, страховка и мебель быстро умножают цифры. Специалисты отмечают, что реальная «ежемесячная температура» удерживается только при детальном учёте мелочей, особенно сервисных платежей и расходов на хранение вещей. Наглядная смета, даже грубая, спасает от ловушки «влезем, а там разберёмся», которая уместна разве что в отпуске на два дня, но в жилье грозит долгой усталостью. Этот подход звучит прагматично, но он освобождает, потому что снимает туман.
Полезно сравнить сценарии владения между несколькими ЖК и классами. Удобная практика — посчитать не только «ежемесячно», но и «за три года», чтобы увидеть эффект от индексации платежей и ремонтов. По опыту коллег, многие пересматривают класс в пользу сбалансированного бизнес-класса с качественной УК вместо шумного «квази-премиума», где фасад блестит, а расходы текут незаметными ручьями. И наоборот, кто часто летает и ценит абсолютную тишину, иногда доплачивает за настоящий премиум — и не жалеет, ведь это инвестиция во время и нервы. Ключ — честная калькуляция, не реклама и не эмоции.
Ниже — короткая сопоставительная таблица, которая помогает увидеть структуру расходов как в прокате авто, так и в квартире. Она служит ориентиром, а не приговором — каждая локация уникальна, зато логика одинакова.
| Позиция | Аренда люксового авто | Квартира в ЖК | Комментарий экспертов |
| Базовый платёж | Суточный тариф | Ипотека/покупка | Определяет класс, но не реальный комфорт |
| Эксплуатация | Топливо, платные дороги | Коммуналка, содержание | Растёт с классом и метражом |
| Парковка | Паркинг в центре | Место в паркинге | Критична для комфорта и спокойствия |
| Страхование | Депозит/франшиза | Страхование имущества | Снижает стресс, но требует бюджета |
| Износ/амортизация | Ограничение пробега | Ремонт, мебель | Часто недооценивается на старте |
Экономика — не всё, но без неё сервис превращается в дорогую иллюзию. Практика показывает, что удачный проект — это всегда про соотношение KPI комфорта к затратам времени и денег. Чем ближе дом к рабочим и семейным маршрутам, тем ниже «цена километра жизни»; чем честнее управляющая компания с цифрами, тем стабильнее ROI настроения. Да, звучит немного сухо. Но именно так получается жить красиво и без постоянного ощущения, что праздник обложен счетами.
Формула «цена удобства» удерживает класс под контролем
Цена удобства равна дополнительным тратам минус экономия времени и нервов; её стоит считать при каждом сравнении. Это защищает выбор от маркетинговых миражей.
Специалисты предлагают считать минуту личного времени как денежный эквивалент, умножая на частоту поездок. Если дом экономит по 30 минут в день по маршрутам, а обслуживание дороже на умеренную сумму, итог всё равно часто в пользу ближней локации. По опыту коллег по люкс-поездкам, такой подход легализует дорогой, но логичный апгрейд. Наоборот, блестящий фасад на периферии, который требователен к такси и бензину, в трёхлетнем срезе делает жизнь дороже и шумнее. Формула проста, но действует безотказно.
Сервис и тишина: как считывать уровень ЖК и двора
Сервис считывается по следам: чистота, запахи, реакция персонала, износ, тишина во дворе. Эти маркеры надёжно различают классы и влияют на ежедневный комфорт.
Оценка начинается с входной группы: состояние ковролина, работа доводчиков, приветствие охраны, чистота зеркал и почтовых зон. Специалисты отмечают, что запах в лобби — самый честный датчик: где пахнет пылью и сыростью, там сэкономили и на скрытых работах. Дальше — лифты: скорость, плавность, аккуратность панелей. Диспетчерская — сердце дома, и если там бодрый голос, который решает, а не ссылается, то проект получил хороший фундамент. На улице важны шумы: гул магистрали, визг площадок, лающие собаки ночью. Всё это бывает и в дорогих адресах, поэтому тест обязателен для всех классов.
Полезно отделить «сервис на показ» и реальный. Первый — это улыбки на экскурсиях и выставочные шоу-румы; второй — скорость реакции ночью, готовность мастера приехать в непогоду, аккуратность дворников на мокром снегу. По опыту коллег, один вечерний звонок в диспетчерскую заменяет час рассказов менеджера. Если менеджер говорит красиво, а диспетчер отвечает устало или вообще молчит, жильцам останется только терпеть. Это как случай с прокатом, где салон сверкает, но вторую карту принять «не могут» — сигнал считывается мгновенно.
Тихий двор — не пафос, а качество сна и концентрации. Оценивается тип покрытия, тип игр у детских зон, высота зелени, разрывы с соседями, близость мусорных камер. Специалисты рекомендуют прийти днём и вечером, пройтись с диктофоном, снять минуту звука в самой громкой и самой тихой точке. Такой мини-аудит субъективность снижает, а память освежает, потому что эмоции от красивого лобби быстро вытесняют факты. Не лениться. Сон и рабочая пауза того стоят.
- Быстрая реакция УК на заявку: до 10 минут — высокий уровень, дольше часа — сигнал насторожиться.
- Чистота лестниц и подсобок: если видны подтеки и хлам, сэкономили не там.
- Запахи в лобби и лифте: запах бытовой химии — нормально, затхлость — тревожный маркер.
- Шум во дворе в пиковое время: устойчивый гул — минус к качеству сна и концентрации.
Ниже — небольшая таблица признаков живого сервиса. Её удобно распечатать и отмечать галочками. Это не жанр эстетики, это рутина, но именно рутина делает дом поддерживающим, а не изматывающим.
| Признак | Что смотреть | Оценка «хорошо» | Оценка «плохо» |
| Входная группа | Ковры, двери, запах | Сухо, без сквозняков | Сырость, хлопающие двери |
| Охрана | Приветствие, участие | Здороваются, помогают | Отворачиваются, бурчат |
| Лифты | Плавность, износ | Быстро, тихо, чисто | Дёргаются, царапины |
| Двор | Шум, покрытие | Спокойно, мягкое покрытие | Эхо, твёрдый бетон |
Сигналы честной управляющей компании считываются с порога
Честная УК отвечает быстро, говорит по делу и бережёт мелочи; слабая — прячется за формулировками. Это легко проверить несколькими звонками и визитами.
Эксперты советуют сделать три проверки: запросить регламент по заявкам, уточнить график уборки, попросить показать комнату для персонала и кладовые. Если регламенты на месте, графики не стыдно показать, в подсобках чисто и есть расходники — дом чувствует жильца. Если вместо ответов — «напишите в чат» и «завтра будет другой менеджер», лучше насторожиться. По опыту коллег, хорошая УК дорожит репутацией и не играется в прятки. Люди — главная инженерная система дома.
Маршруты, паркинг и логистика: как сузить выбор по времени
Логистика режет рынок без эмоций: время до деловых и семейных точек определяет класс жизни сильнее фасадов. Измерение маршрутов даёт объективный фильтр.
Для тех, кто привык планировать поездки с пересадками и трансферами, построение карт времени — вторая натура. Здесь применяется то же: берутся три-четыре ежедневных направления, измеряется дорога утром и вечером, добавляется парковка на старте и финише. Специалисты отмечают: честная карта времени убивает красивые, но неудобные локации и вытаскивает на свет неочевидные, но точные. Это скучная математика, но она освещает весь ландшафт. И да, десять минут в одну сторону — это уже не «ерунда», это тридцать часов в сезон.
Паркинг — не опция, а продолжение квартиры. Даже при наличии такси и каршеринга постоянное место снижает стресс, особенно если возвращение позднее и с багажом. По опыту коллег, идеален паркинг с прямым лифтом в секцию, широкими проездами и разворотным пространством; приемлем — с короткой прогулкой под козырьком; проблемный — через двор и лужи, с узкими рампами и острыми углами. Это звучит приземлённо, однако именно здесь тонкие отличия ежедневности становятся громкими.
Ниже — ориентировочная таблица оценки маршрутов. Значения условны и служат для первичного сита; дальше нужно ездить и мерить свой ритм. Тем не менее как первый фильтр она незаменима, особенно когда глаза устают от красивых планировок.
| Маршрут | Утро, мин | Вечер, мин | Парковка/выезд, мин | Итог, мин |
| Дом → офис | 25 | 35 | 10 | 70 |
| Дом → школа/сад | 12 | 15 | 5 | 32 |
| Дом → фитнес/хобби | 10 | 12 | 4 | 26 |
| Дом → аэропорт | 45 | 55 | 15 | 115 |
Если логистика «поёт», остальное легче прощается. Но важно не подменять реальность надеждой: тесты делаются именно в ваше время, по вашим точкам. Специалисты советуют повторить поездки дважды в разные дни и сверить ощущения. Неожиданные задержки, странные узкие места на выезде, сложные развороты, постоянные ремонтные работы — всё это делает из обещанных двадцати минут сорок и, главное, крадёт настроение утром. Дом должен помогать стартовать, а не объясняться с пробками.
Паркинг в срезе качества: на что смотреть на месте
Качество паркинга определяется шириной проездов, высотой потолка, прямыми въездами и вентиляцией. Эти параметры влияют на ежедневный комфорт больше, чем кажется.
Эксперты рекомендуют проверить реальную ширину места, выкатить рулетку, проехать пару кругов, оценить зеркала и разметку, посмотреть на состояние пола и водостока. Если руль приходится крутить в три приёма, а на полу лужи, радость от нового дома быстро поблёкнет. Напротив, хорошо организованный спуск и прямой лифт дадут ту самую лёгкость, ради которой вообще затевалась покупка. Здесь метры — это нервы, и наоборот.
Документы, ДДУ и проверка застройщика без ошибок
Проверка застройщика и условий ДДУ защищает деньги и сроки; это база, без которой красивые рендеры — просто картинки. Документы читаются внимательно и спокойно.
Специалисты отмечают: как при аренде люксового авто важны прозрачный договор, состояние франшизы и понятные санкции, так и в покупке квартиры через ДДУ важны право на участок, проектная декларация, сроки, ответственность и страхование. Полезно просмотреть судебные споры, отзывы по предыдущим очередям, качество управляющих компаний внутри холдинга. По опыту коллег, две-три встречи с юристом экономят месяцы ожиданий и нервы на финише. Бумаги — не роман, но лучшее чтиво для спокойной ночи.
Не нужно быть юристом, чтобы уловить смысл. Достаточно таблицы контроля рисков и чек-листа вопросов. Если менеджер увиливает, говорит общими словами и просит «не беспокоиться», это как «безлимитные пробеги, но мелким шрифтом» — опасный жанр. Если же предоставляет доступ к документам, не скрывает подрядчиков, чётко отвечает по гарантиям и сервису, — такой партнёр заслуживает внимания. Важна прозрачность, а не идеальность.
Ниже — компактная таблица для чтения ключевых пунктов договора. Её удобно держать под рукой во время переговоров и сверки редакций. Спокойный, последовательный подход разряжает воздух и фиксирует договорённости.
| Пункт | Что проверить | Какой вопрос задать | Сигнал риска |
| Сроки | Диапазон ввода, перенос | Какая компенсация при сдвиге? | Размытые формулировки |
| Отделка | Точный перечень | Есть ли ведомость материалов? | «По стандарту», без списка |
| Паркинг/кладовая | Юридический статус | Отдельный договор или приложение? | Несогласованная схема |
| Гарантии | Сроки и объём | Как оформляются обращения? | Нет регламента |
- Запросить проектную декларацию и разрешение на строительство, сверить участки и обременения.
- Проверить финансовую устойчивость группы: сданные очереди, отзывы по УК, динамику строительства.
- Согласовать формулировки по шумоизоляции, окнам и инженерии в письменной редакции.
- Зафиксировать порядок приёмки: замеры, сроки исправлений, доступ к техпомещениям.
Апартаменты или квартира: различия важны на длинной дистанции
Апартаменты и квартира различаются назначением земли, налогами и правилами эксплуатации; выбор влияет на бюджет и сценарий жизни. Решение принимается с учётом реального ритма.
Эксперты подсказывают: если нужна регистрация, школа по месту и предсказуемые коммунальные платежи, классическая квартира проще. Апартаменты гибче в сценариАх жизни и подходе к управлению, но потребуют внимательнее считать эксплуатацию и воспринимать иные нормативы. По опыту коллег, когда приоритет — инвестиции и гибкость сдачи, апартаменты выигрывают скоростью, когда — семья и быт, квартира снимает лишние вопросы. Выбор не религиозный, а прагматичный.
Тест-драйв района: ночёвка, звуки, сервисы и ритуалы дня
Тест-драйв района раскрывает правду быстрее форумов: ночь, утро и час пик показывают звук, свет, запахи и логику повседневности. Такой тест экономит месяцы сомнений.
Подход из премиальной аренды прост: прежде чем взять редкий суперкар на длительный срок, многие просят короткий выезд. С домом — то же самое. Специалисты рекомендуют снять на сутки поблизости, прожить один вечер и одно утро по своим маршрутам, послушать, как двор звучит после десяти, и как выезд работает в восемь. Проверить, есть ли поздняя доставка, как курьеры находят подъезд, как навигатор ведёт гостей. Реальность иногда ломает ожидания, но лучше сейчас, чем после подписания актов.
Маршрутные ритуалы — кофе, спорт, прогулка, детский круг — стоит прогнать в боевом режиме. По опыту коллег, именно здесь вскрывается «мелкая» география: где переходить дорогу, где дует, где мокро, где темно. В хорошем месте мелочи складываются в заботу, в среднем — в бесконечные компромиссы. Выбор должен подкрепляться телесной памятью, а не только папкой со сравнительными таблицами. Иначе красивая кухня обернётся редкими завтраками дома и вечной спешкой.
Ночной звук — строгий учитель. Эксперты советуют открыть окно, выключить холодильник, посидеть в тишине десять минут и просто слушать. Гул магистрали может быть незаметен днём и резать ухо ночью. Шум детских площадок приятен вечером, но днём в выходные превращается в фоновую какофонию. Проверка проста, почти медитативна, зато экономит нервные клетки в будущем. Спокойный сон — не роскошь, а нужный инструмент.
Сервисы тоже показывают класс района: как быстро едет такси, как курьеры ориентируются, есть ли вечерние доставки без «звоните водителю». Да, сутки — мало, но достаточно, чтобы почувствовать темперамент места. По опыту коллег, после такого теста половина «сомневаюсь» исчезает сама, и остаётся либо уверенное «да», либо такое же уверенное «нет». И это прекрасный результат для долгого решения.
План «24 часа» превращает ощущения в факты
План визита фиксирует маркеры и экономит силу на эмоции; достаточно шести проверок, чтобы получить ясность. Такой подход сокращает количество визитов.
Эксперты предлагают структуру: вечерняя прогулка по двору, ночное прослушивание, утренний выезд и парковка, поход с коляской/сумками, визит в ближайший магазин и аптеку, пробный приезд курьера. Каждый пункт занимает 10–20 минут и запоминается лучше, чем час беседы у ресепшена. Итог — короткий отчёт на полстраницы и честная оценка, подходит ли место под ритм. Если нет — двигаться дальше без сожалений, если да — фиксировать условия и брать паузу перед торгом. Решение должно отстояться, как хороший эспрессо.
Планировки как в пятизвездочном номере: зонирование, свет, хранение
Планировка выигрывает, когда зонирование повторяет логику пятизвёздочного номера: тихая мастер-зона, прямые пути, щедрое хранение и честный свет. Эти вещи делают быт легким.
Специалисты отмечают, что привычки из люкс-поездок идеально транслируются в дом: мастер-спальня с отдельным санузлом и гардеробной, входная группа с местом для чемоданов/колясок, кухня-гостиная с чёткими сценариями света. По опыту коллег, лучше меньше стен, но больше продуманной мебели и хранения. Коридоры с поворотами, нефункциональные ниши, проходные спальные — враги тихой жизни. Важно проверять реальные габариты: глухой угол слепит, а окно на север избавляет от перегрева. Не гнаться за экзотикой, искать простую геометрию, где вещи и люди не мешают друг другу.
Свет — отдельная дисциплина. Утренний восток бодрит, запад дарит закаты, север ровный, юг щедрый, но жаркий. Экспертам близка метафора: как выбор номера с видом определяет тон поездки, так ориентация окон задаёт настроение дома. Гостиную лучше выводить на приятный вид, спальни — на тихую сторону или двор-сады. И да, планировки с цельными окнами выше метра дают иной объем, чем крошечные «глазки». Если вид в приоритете, стоит торговаться за этаж и ориентацию, а не за лишние полтора метра у коридора.
Хранение — не скука, а свобода. Гардеробные, постирочные, ниши для спортивного и дорожного снаряжения делают утро короче, а вечер спокойнее. По опыту коллег по аренде авто, чем меньше вещей болтается под ногами, тем дороже кажется салон — в доме та же магия. Кладовая рядом с паркингом решает сезонное хранение, экономит подъезд и лифт. Стоит добавить в таблицу переговоров «кладовую как условие», это упреждает хаос на финише ремонта.
Ниже — компактная таблица приоритетов планировок по сценариям жизни. Она помогает не спорить, а мерить, и вежливо ставит точку в лишних дискуссиях «камин против кладовой».
| Сценарий | Главный приоритет | Что допустимо упростить | Комментарий |
| Семья с детьми | Хранение и тишина спален | Сложные перепады уровней | Кладовая и постирочная критичны |
| Частые перелёты | Логистика и паркинг | Экзотическая отделка | Прямой лифт из паркинга решает |
| Работа из дома | Свет и звукоизоляция | Декоративные ниши | Кабинет в тихой зоне спасает |
Мини-чек-лист осмотра квартиры защищает от импульса
Короткий чек-лист на осмотре дисциплинирует взгляд и гасит эмоциональные перепады; он переводит «нравится» в «подходит». Пять пунктов хватает для ясности.
Эксперты предлагают пять вопросов: как идёт свет утром и вечером; какой звук в спальне при открытом окне; где будут жить чемоданы и сезонные вещи; насколько прямые пути из двери к кухням/санузлам; как организуется сушилка и постирочная. Ответы честно ставят оценку планировке и, что важнее, закрывают быт без героизма. Такой подход не мешает влюбиться, он помогает влюбиться в надёжное.
Итог. Подход роскошных путешествий и продуманной аренды люксовых авто корректно пересаживается в реальность выбора дома: маршрут, сервис, документы и планировка складываются в спокойный, предсказуемый алгоритм. Когда каждый шаг проверен, дом перестаёт быть лотереей и становится логичным продолжением привычек, а привычки — трубопроводом к тихой, красивой повседневности.